
Real-time collaboration in your browser: Use Etherpad in OpenTalk
In this article, we show you how to connect Etherpad to OpenTalk, set up your own editor, and use the integrated protocol module: from the Docker container to the web server configuration to the finished PDF—everything you need for real-time collaboration in your browser.
Etherpad explained: The open source editor for shared notes
Etherpad is an online editor that has it all – in the best sense of the word. It allows multiple people to work on the same document at the same time – directly in the browser. What makes Etherpad special is that every change appears immediately for everyone else. No delay, no “XYZ has saved” – just live.
A clever synchronization mechanism runs in the background: changes are automatically merged, conflicts are avoided, and anyone who wants to can jump back to older versions at any time – including a timeline. The assignment of contributions also remains traceable: each person is assigned their own color when they join, and changes are highlighted in color. This allows you to see at a glance who wrote what.
When a moderator starts the meeting notes, a new pad – as the shared documents are called in Etherpad – is created for the conference. Conference users are then given read or write access depending on their role. As a moderator, you can manage access rights individually. Once the document is finished, it can be exported in various formats: as plain text, HTML file, PDF, or Word document.
Originally launched in 2008 and released by Google under an open source license in 2009, Etherpad is now being further developed by a dedicated community coordinated by the Etherpad Foundation. The software runs on its own servers, is data-efficient and customizable – making it ideal for use in sovereign video conferencing platforms such as OpenTalk.
Etherpad in OpenTalk: What's behind it
To ensure that Etherpad works seamlessly with OpenTalk, our team provides its own Docker image. This is based on the official Etherpad code, supplemented by a few patches and minor improvements.
In addition to the core module ep_etherpad-lite, which provides the actual editor functionality, two specially configured plugins are also included: ep_auth_session allows the controller to generate login links that automatically set a session cookie, thus seamlessly controlling access. With ep_read_session, pads can also be opened in a read-only session. This creates a secure and flexible framework for collaborative work directly in the video conference.
We keep our image as up to date as possible and regularly provide new builds that remain compatible with the official Etherpad project – but are better tailored to the requirements of a sovereign video conferencing solution.
What do I need to use Etherpad with OpenTalk?
To integrate Etherpad into OpenTalk, you basically need three things: a running OpenTalk instance, a functioning Etherpad server, and a web server that forwards requests correctly.
Etherpad runs as a standalone service and provides the interface for shared notes. For communication between OpenTalk and Etherpad to work, two things must be correct: The Etherpad instance must be secured with an API key, and Etherpad must be able to correctly evaluate the HTTP header X-Forwarded-Proto if OpenTalk is running behind a proxy. This is a header that tells the service whether the original request was made via HTTP or HTTPS. To do this, set an environment variable in the container as described in the next section.
The web server requires a little more attention. Etherpad uses WebSockets for the live connection, so if you put Apache or Nginx in front of it, you must ensure that WebSocket connections are passed through correctly. If the appropriate RewriteRule or ProxyPass is missing, the connection will fail – in the worst case, you will only see a “Reconnect timed out” message (see section “Making Etherpad available via Apache with SSL”).
OpenTalk and Etherpad: Docker installation step by step
Etherpad can be run as a standalone Docker container – and that is exactly what we recommend for use with OpenTalk. The connection is established via the meeting_notes module, which is automatically activated as soon as Etherpad is accessible and correctly configured.
In our docker-compose.yaml, we have added a separate service called pad for this purpose. This can be found in our ot-setup repository. The container image comes from the OpenTalk registry and already contains everything you need for operation. The environment variables are particularly important: EP_APIKEY defines the secret key that OpenTalk will use for authentication later on. If you are running Etherpad on a real server behind a reverse proxy – for example, with Apache and your own domain – you should also set TRUST_PROXY. This variable ensures that Etherpad correctly recognizes and processes HTTPS requests. However, it is not necessary in a local test setup without a proxy. Admin access can also be provided directly:
pad:
image: registry.opencode.de/opentalk/etherpad:latest
profiles: ["pad"]
restart: always
environment:
EP_APIKEY: ${EP_APIKEY}
TRUST_PROXY: "${TRUST_PROXY:-true}"
DEFAULT_PAD_TEXT: "${DEFAULT_PAD_TEXT:-Welcome to OpenTalk}"
ADMIN_USER: admin
ADMIN_PASSWORD: <sicheres-passwort>
SUPPRESS_ERRORS_IN_PAD_TEXT: "${SUPPRESS_ERRORS_IN_PAD_TEXT:-true}"
ports:
- "${EP_EXP_PORT:-9001}:${EP_PORT:-9001}"
In addition, add two lines to the controller service (controller: section) so that OpenTalk knows where Etherpad is accessible and how authentication works:
controller:
image: [...]
environment:
[...]
OPENTALK_CTRL_ETHERPAD__URL: "${EP_ENDPOINT:-}"
OPENTALK_CTRL_ETHERPAD__API_KEY: "${ETHERPAD_API_KEY:-}"
The values for the environment variables can be stored in an .env file. The API key is particularly important here—it must match the entry in the OpenTalk configuration:
### etherpad
[...]
EP_ENDPOINT="https://pad.$OT_DOMAIN"
EP_APIKEY=$ETHERPAD_API_KEY
Über EP_ENDPOINT geben Sie die öffentliche Adresse Ihres Etherpad-Servers an (siehe nächster Abschnitt). Der eigentliche Schlüssel wird weiter oben in der .env gesetzt – zum Beispiel so:
ETHERPAD_API_KEY=<geheimer-api-key>
This keeps the configuration clear and easy to automate. The variables EP_ENDPOINT and EP_APIKEY are automatically taken from docker-compose.yaml and the controller – either via the service's environment variables or via the config file controller.toml.
Making Etherpad available via Apache with SSL
To ensure that Etherpad is actually accessible in the browser – reliably and securely – it needs its own subdomain, a valid SSL certificate, and a cleanly configured web server. In our case, Etherpad runs at pad.your-domain.de behind an Apache server, but the setup works just as well with Nginx.
The Let's Encrypt certificate is integrated system-wide. It is crucial that Etherpad uses WebSockets for real-time communication. These must be forwarded correctly by the web server:
<VirtualHost *:80>
ServerName pad.ihre-domain.de
Redirect permanent / https://pad.ihre-domain.de/
</VirtualHost>
<VirtualHost *:443>
ServerName pad.ihre-domain.de
SSLEngine on
SSLCertificateFile /etc/letsencrypt/live/ihre-domain.de/fullchain.pem
SSLCertificateKeyFile /etc/letsencrypt/live/ihre-domain.de/privkey.pem
Include /etc/letsencrypt/options-ssl-apache.conf
ProxyPreserveHost On
RequestHeader set X-Forwarded-Proto "https"
RequestHeader set Host "pad.ihre-domain.de"
# WebSocket-Unterstützung
RewriteEngine on
RewriteCond %{HTTP:Upgrade} =websocket [NC]
RewriteRule /(.*) ws://127.0.0.1:9001/$1 [P,L]
ProxyPass / http://127.0.0.1:9001/ retry=0 timeout=300 keepalive=On
ProxyPassReverse / http://127.0.0.1:9001/
<Location />
Require all granted
</Location>
ErrorLog /var/log/apache2/pad_error.log
CustomLog /var/log/apache2/pad_access.log combined
</VirtualHost>
It is also important that the required Apache modules (proxy, proxy_http, proxy_wstunnel, headers, and rewrite) are enabled.
Starting Etherpad: How to run the container cleanly
Once the configuration is complete, Etherpad can be started—preferably using the Compose command with the profile enabled:
docker compose --profile pad up -d --build
This starts the service in the background and rebuilds it if anything has changed in the image. Once the container is running, Etherpad can be accessed in the browser – for example, at https://pad.ihre-domain.de. If you want to be absolutely sure, test it in advance via the terminal:
curl -vk https://pad.ihre-domain.de
If the server responds, the connection is set up correctly and Etherpad is ready for use in OpenTalk.
If you want to make sure that everything is working correctly in the background, take a look at the Docker logs:
$ docker logs opentalk-pad-1
[...]
[2025-06-20T09:18:23.160] [INFO] server - Etherpad is running
[2025-06-20T09:19:03.892] [INFO] http - Successful authentication from IP
ANONYMOUS for user <no username>
[2025-06-21T10:16:06.607] [INFO] access - [CREATE]
pad:g.DzIM1Ay9NS3ag5v7$meeting_notes socket:rEM5Bqc5Ts6VS8teAAAF IP: ANONYMOUS
authorID:a.WFIx7tBpMzMUy2qf
Share the minutes function in OpenTalk
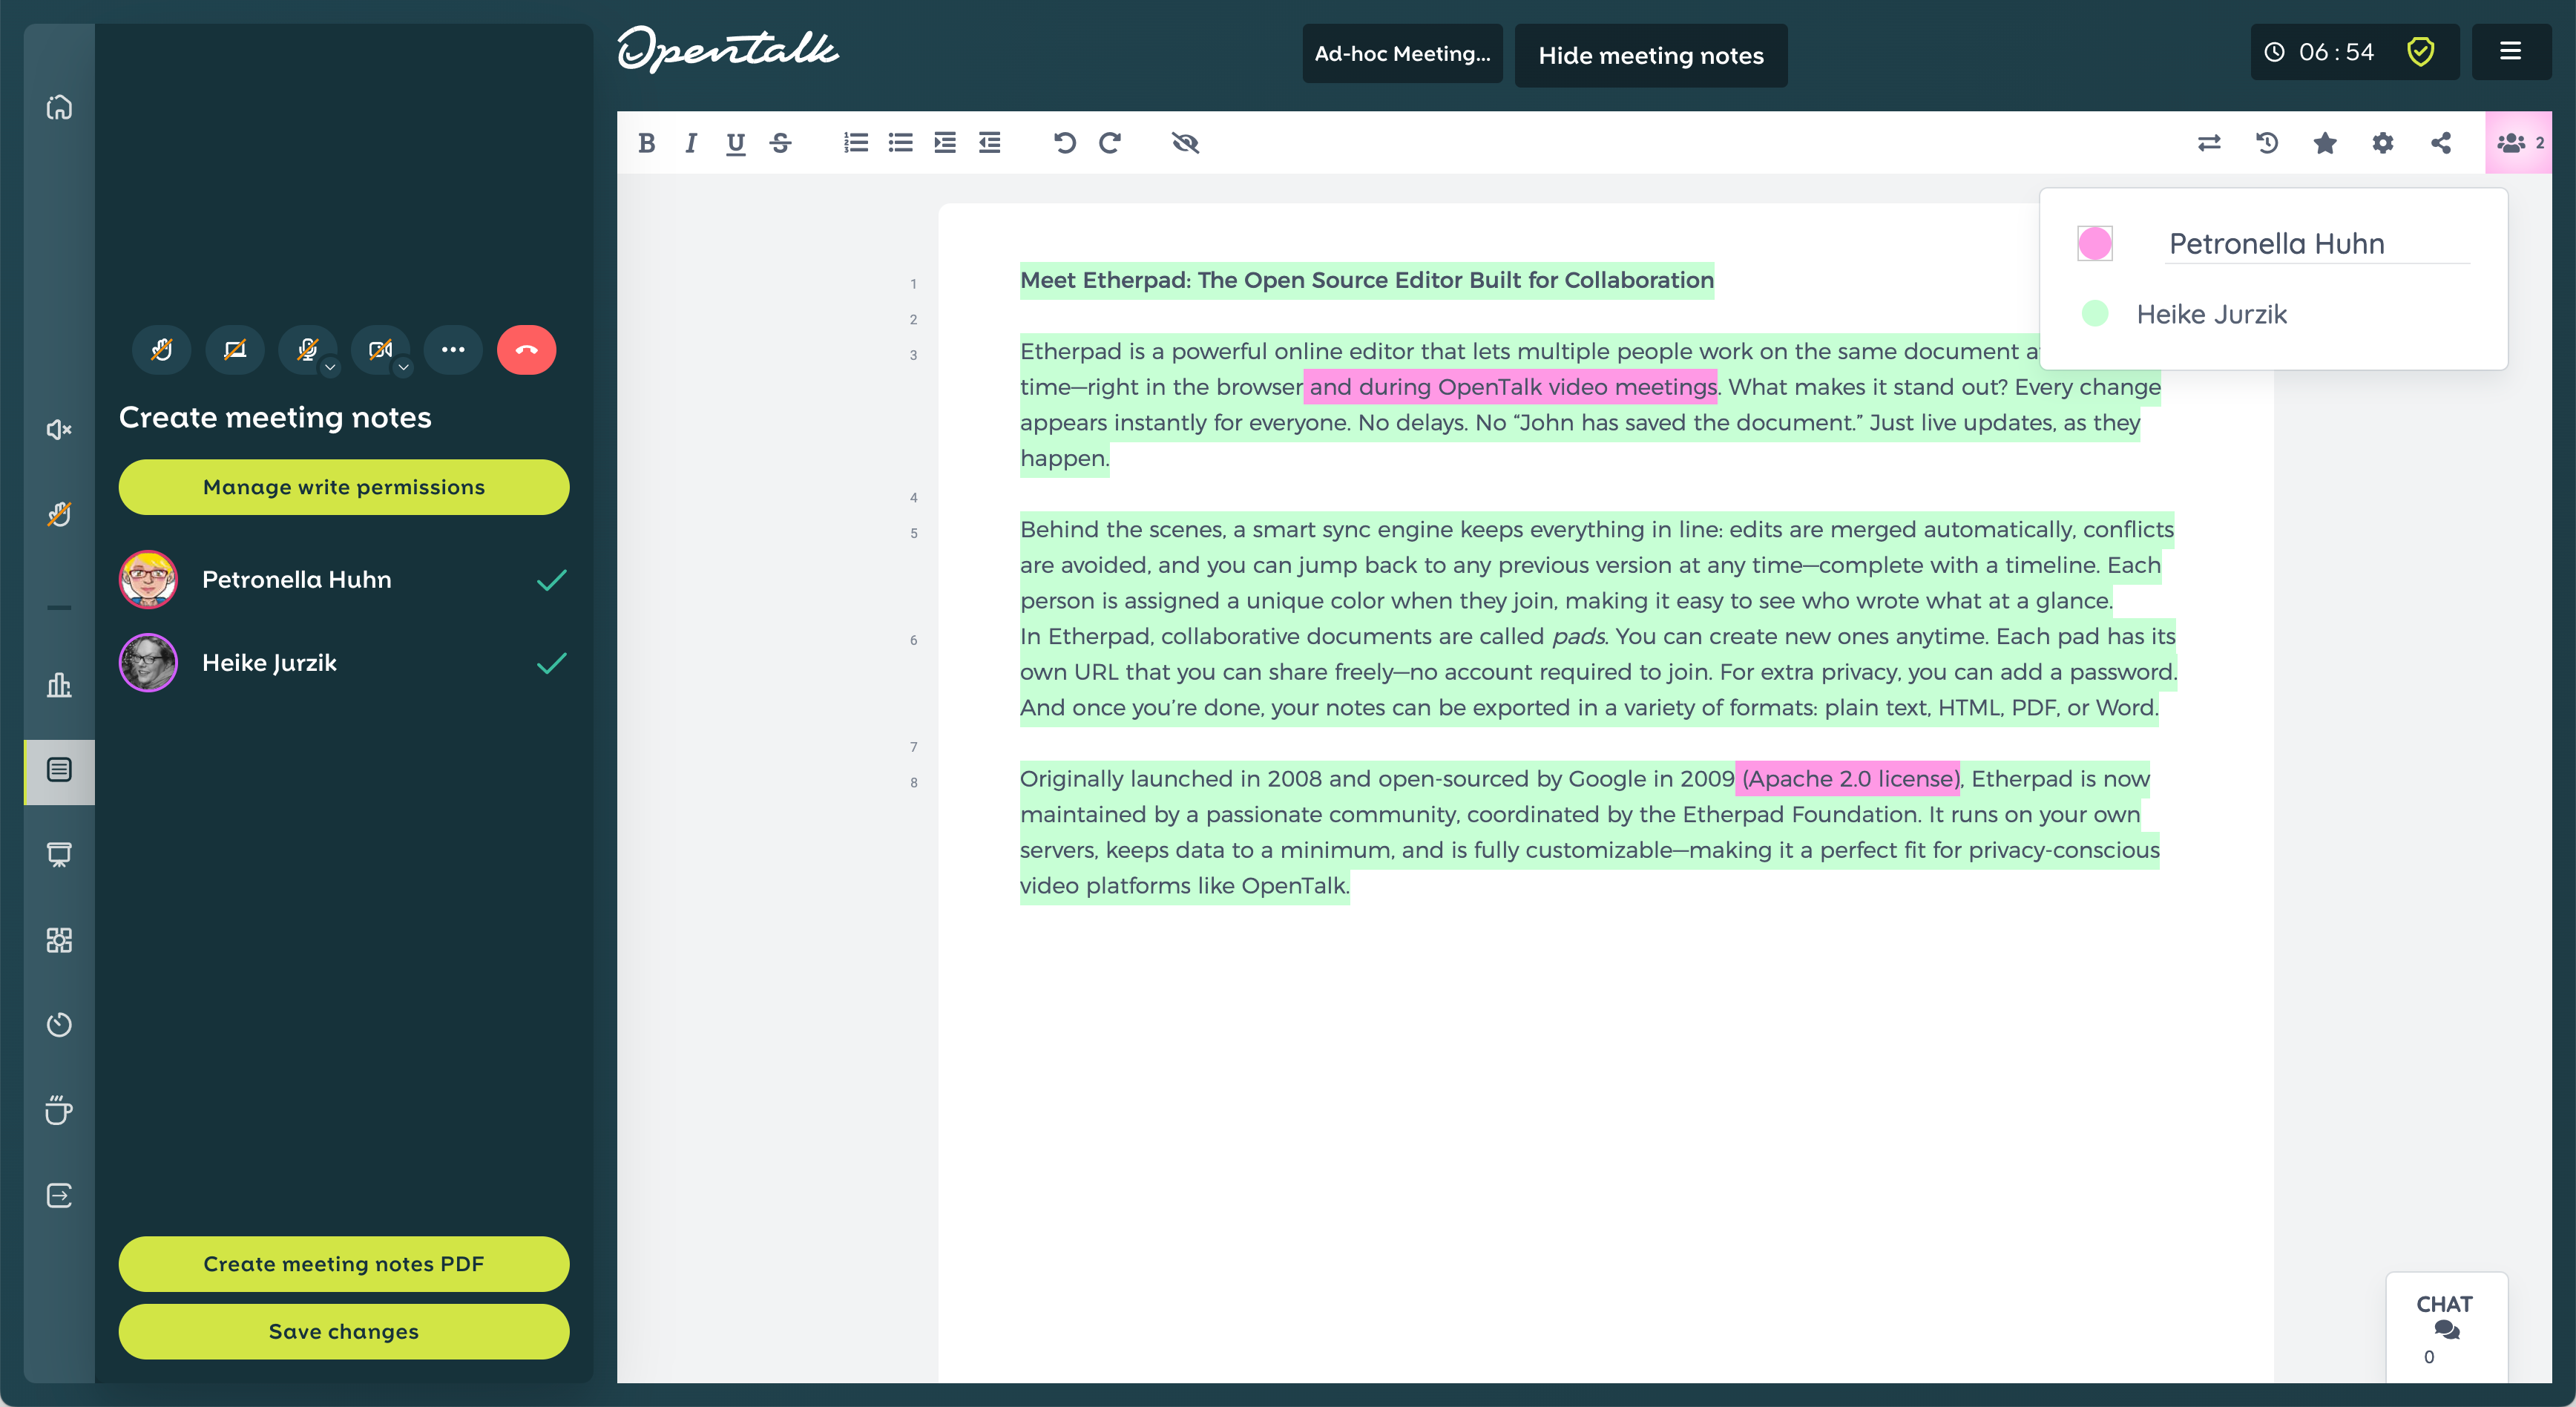
Once Etherpad is integrated into OpenTalk, participants in the meeting have access to an additional function: shared minutes. This is an embedded Etherpad document that is displayed directly in the video conference—visible to everyone, but editable only by those who have been assigned writing permissions.
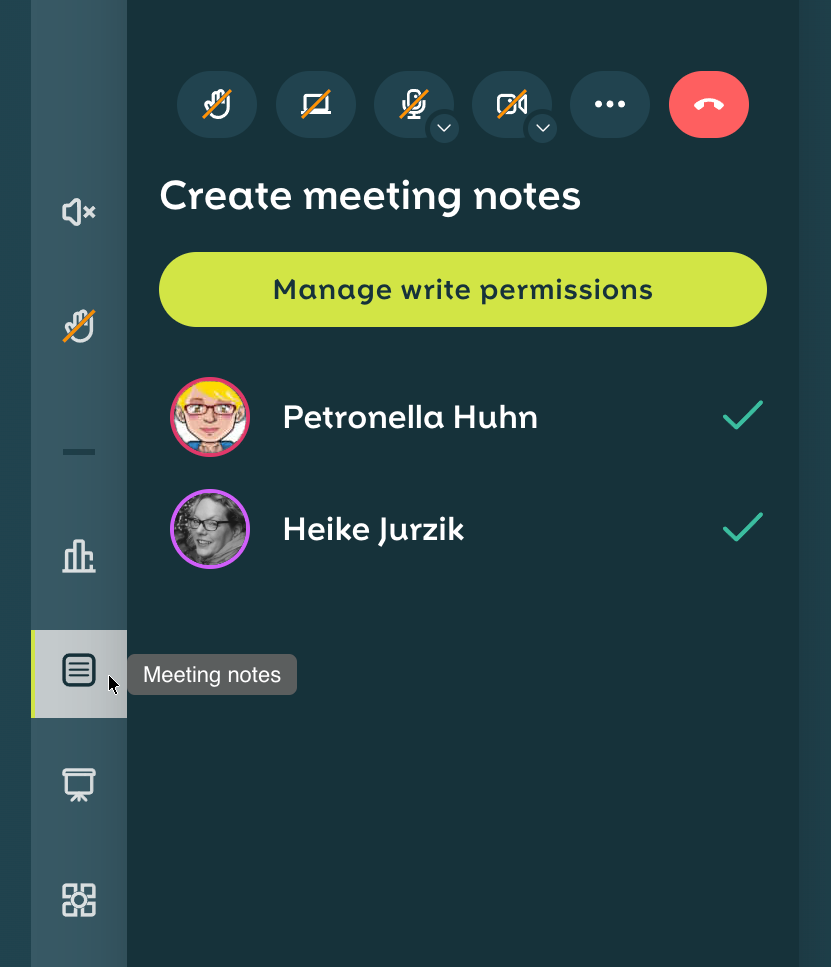
The process is simple: the host starts the minutes by clicking on the icon in the left sidebar, assigns write permissions, and clicks on Show minutes for all:
The pad will then appear as an additional tab in the top screen bar, next to the view selection. If you want to hide the window later, click Close Log to return to the normal conference view.
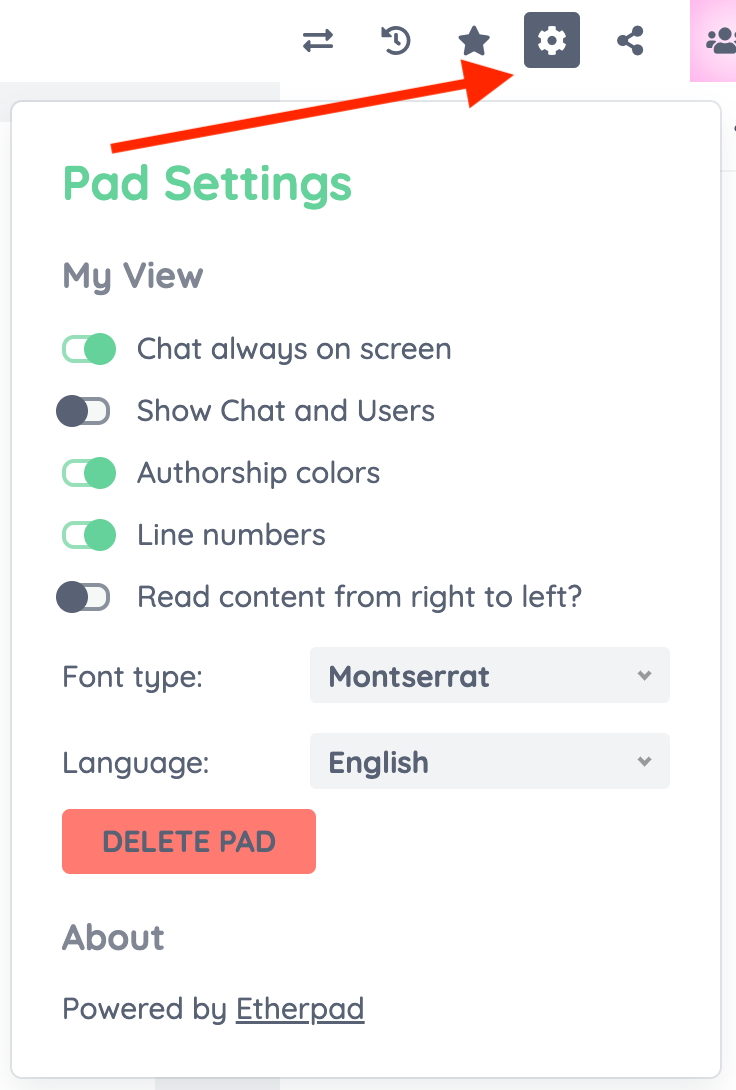
The actual editing takes place directly in the editor. The title bar contains various tools for adjusting formatting or structuring the text. Clicking on the small gear icon in the top right corner takes you to the pad settings: Here you can specify whether the user list should be displayed, whether the authors' colors are visible, or whether line numbers are displayed. The font and language can also be customized here. A particularly useful feature is that these settings only apply to your own view – other participants will continue to see their own configuration.
Saving minutes: Export and import options
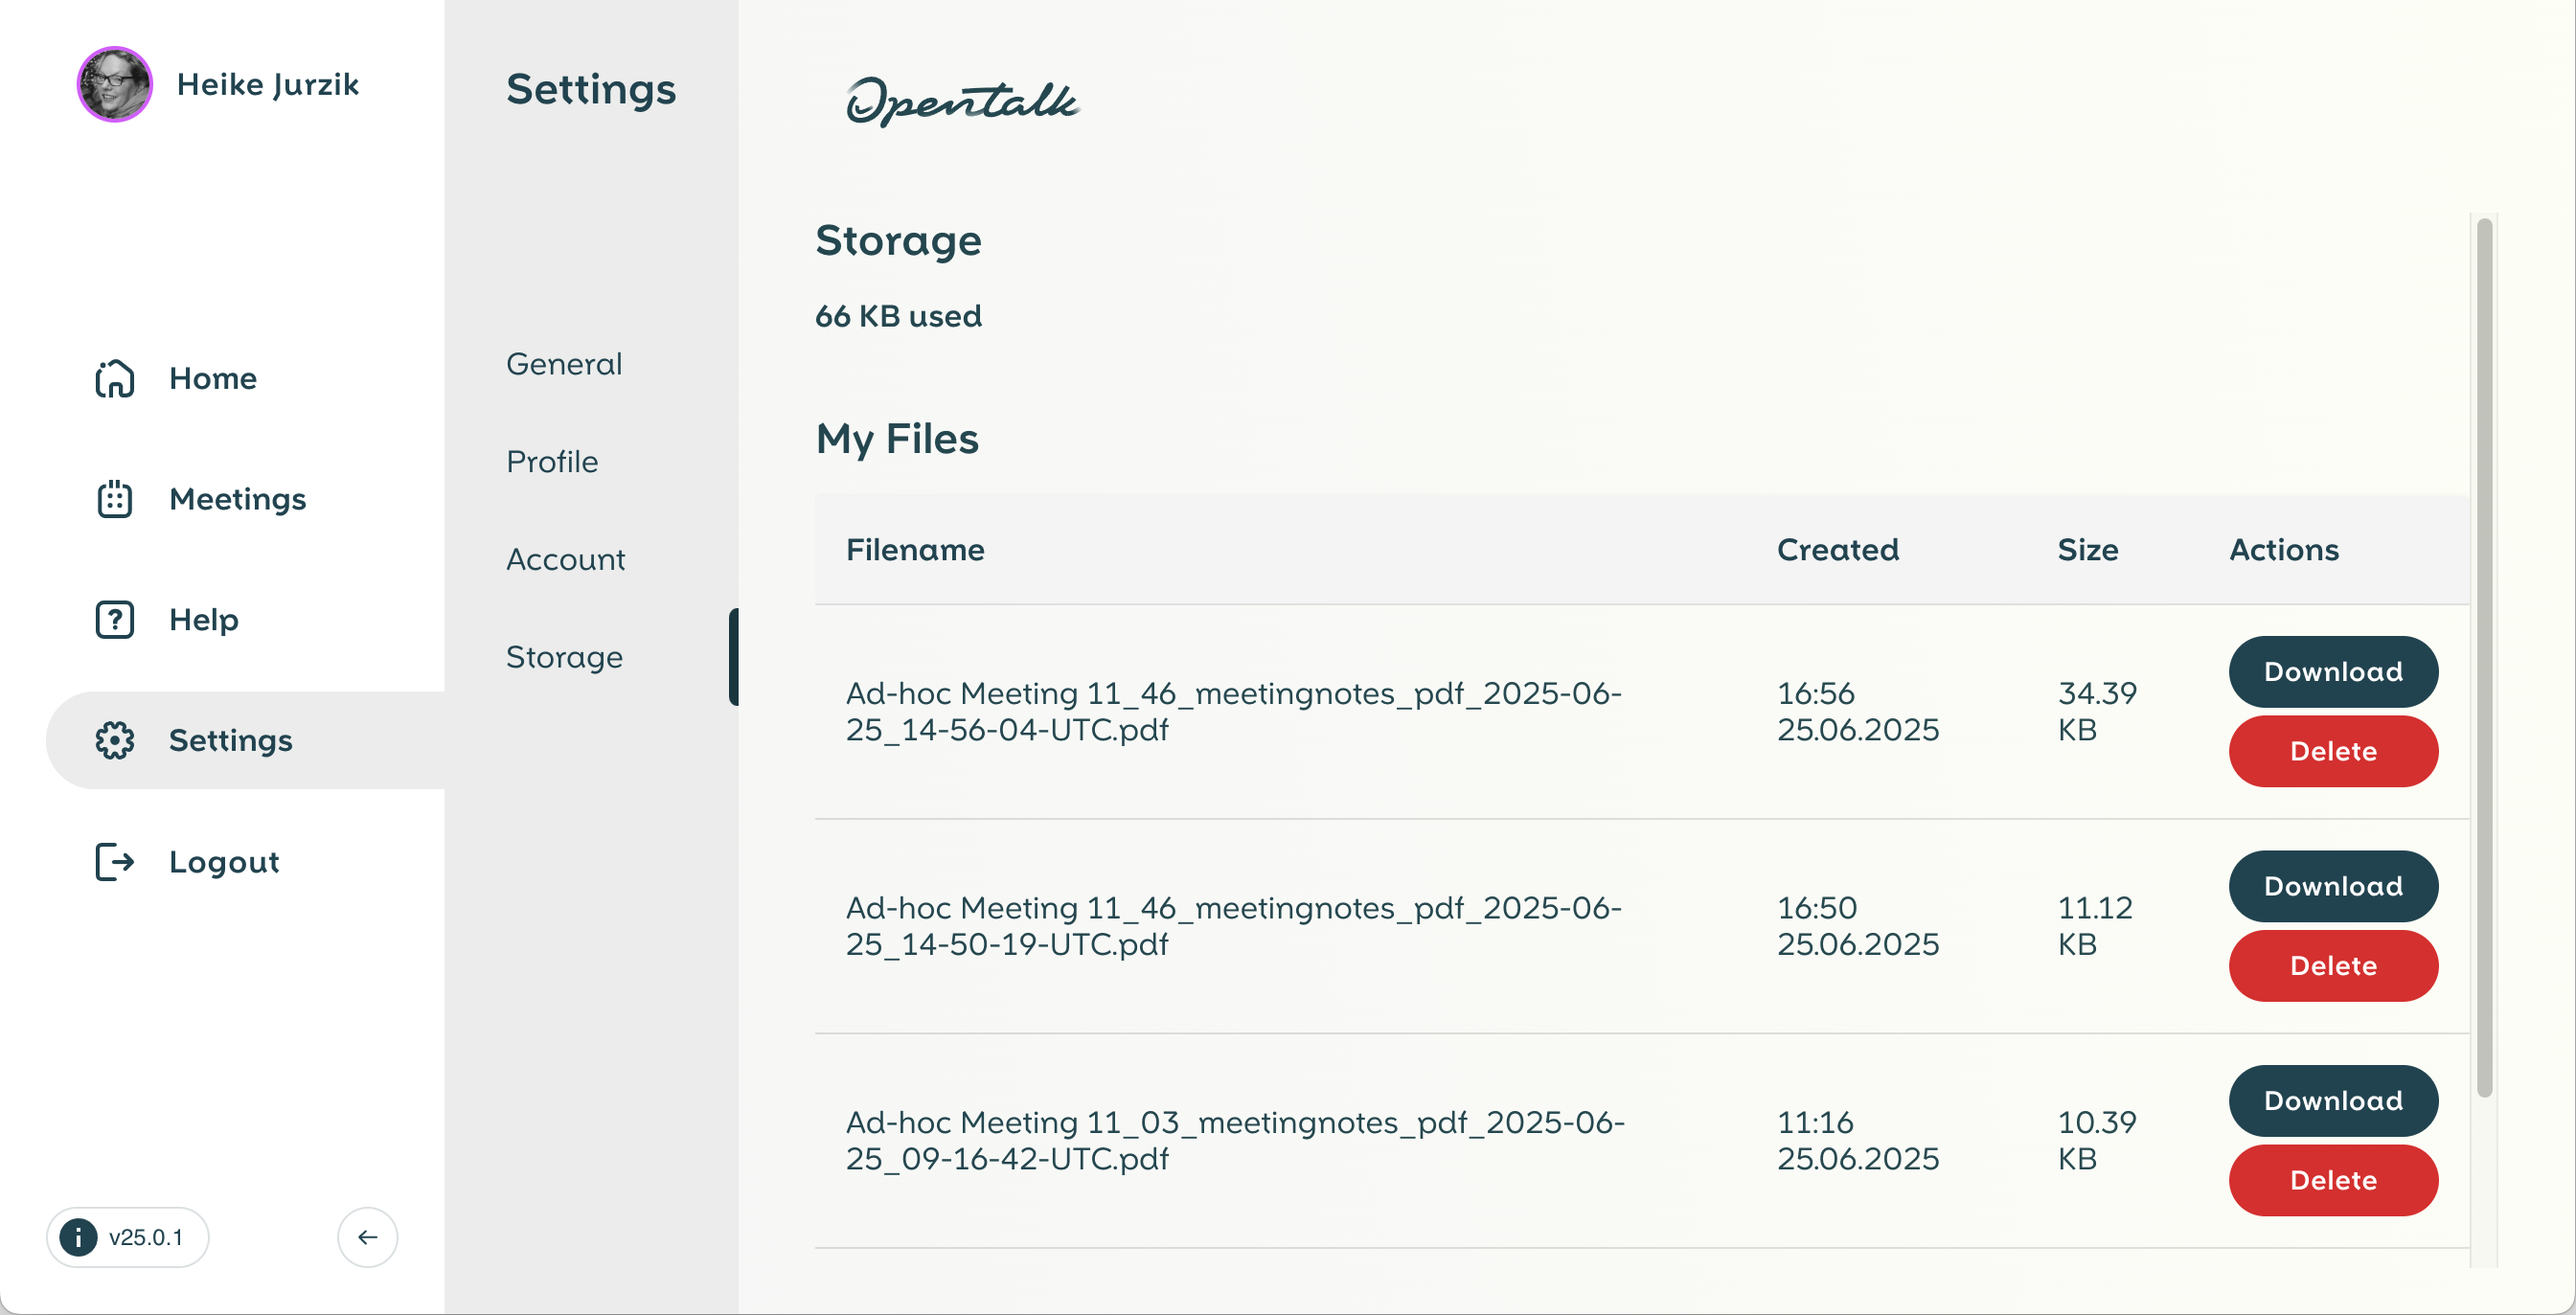
What is created together during a meeting should not be lost at the end. That is why the current minutes can be saved in OpenTalk in two ways: Either directly from the editor view via the Import/Export option or via the Create PDF minutes button at the bottom left of the sidebar. The latter not only creates a PDF of the current minutes, but also automatically saves it in the personal storage area of the respective user. The PDFs appear there with a timestamp and can be downloaded or deleted at any time – they can be found under Settings / Storage.
If you prefer to use other formats, open the import/export function via the icon with the two arrows at the top right above the pad. Various export options are available there: HTML, plain text file, Microsoft Word, PDF, or ODF (Open Document Format). Exporting in the native Etherpad format is also possible—ideal for backups or further technical processing.
Prepared content can be imported into the pad just as easily – for example, pre-formulated meeting minutes that are to be supplemented during the meeting. Simply select a file, click Import now – and get started.
Sovereign documentation – directly from the meeting
The integration of Etherpad into OpenTalk shows how useful open source tools can be when they work together – pragmatically, with data sovereignty and without media discontinuity. What used to end up in emails, chat histories or individual Word documents is now recorded jointly in the meeting.
Etherpad is not a new tool, but it fits perfectly with the OpenTalk concept: decentralized control, ease of use and full transparency. And that's exactly why we use it – not as a gimmick, but as an integral part of our meetings.
Open source thrives on collaboration – just like Etherpad and OpenTalk. If you want to know what we're working on and what new features are coming soon, follow us on LinkedIn, Mastodon, or Bluesky!
More articles
Implementing hybrid working effectively — technology, culture, processes
At first glance, implementing hybrid working models seems straightforward: staff work partly in the office and partly remotely, supported
OpenTalk at the Bechtle IT Expo 2026
The Bechtle IT Expo 2026 provides the ideal setting for discussing these issues together with experts from the worlds of business, public administration and politics.